Building a Static File Server in ASP.NET Core RC2 with the CLI
The Pitch
The fine folks over at Microsoft released ASP.NET Core RC2 this week which dramatically changed a lot of things under the hood and introduced the new dotnet CLI, a command line interface that works on Windows, OSX and Linux. You can find installers for your platform at dot.net.
With this release, most of the major interfaces and apis are locked in and will most likely not change between now and RTM. I felt it was a good time to start digging in and learning the new platform. You can of course install the Visual Studio tooling and use File > New Project to generate everything for you and start working with the new MVC/Entity Framework bits right away. But I am looking for a deeper understanding of how these things fit together. So I set out to build a simple static file server using only the CLI and a text editor. I also wanted to do this completely in OSX.
The Setup
To get a development environment setup, you need to first install the platform. On OSX, this involves installing OpenSSL followed by the .NET Core SDK via a pkg package. Detailed instructions can be found here.
You will also need a text editor; you are free to use any you like but Visual Studio Code has some nice built in features that make working with C# and .NET Core similar to what you may be used to in Visual Studio on windows. I found that while a bit buggy the Insiders build offered the best full experence.
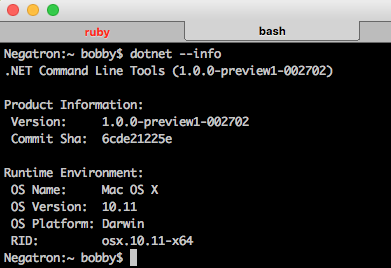
Once everything is installed, you can verify your environment by firing up bash and issuing the following commands:
dotnet --info will display details about the version of the CLI and your environment like this.
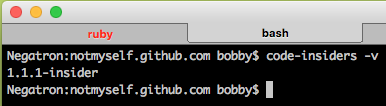
code-insiders -v will display the version of Visual Studio Code like this.
Note: These validation steps work similarly on Linux and Windows (via PowerShell).
Creating a Package
Now that the development environment is setup, we can create the first code asset. We can do this via the dotnet cli fairly simply. In bash excute the following commands:
mkdir static_server
cd static_server
dotnet new
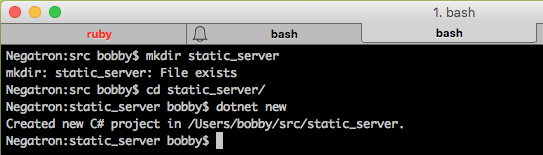
This will create a bare minimum .NET Core "Hello World" console project. At this level the project consists of two files Program.cs and project.json. Project.json is a metadata file describing the project and its dependencies. Program.cs is our buildable code asset containing the executable functionality.
project.json
At a minimum project.json has three bits if needed information: the version of the project, the project dependencies, and the platform framework the project is intended to execute on. Because this is a console application the build options section is needed to instruct the compiler to create an entry point.
The only dependency the package currently has is on Microsoft.NETCore.App which is a meta package that references a ton of other smaller packages. Think of this as stdlib. We can even declair explicitly that it is a platform depedency which will effect how the application is published. Platform dependecies are assumed to already be available on the deployment environment, so the deployment package does not need them.
{
  "version": "1.0.0-*",
  "buildOptions": {
    "emitEntryPoint": true
  },
  "dependencies": {
    "Microsoft.NETCore.App": {
      "type": "platform",
      "version": "1.0.0-rc2-3002702"
    }
  },
  "frameworks": {
    "netcoreapp1.0": {
      "imports": "dnxcore50"
    }
  }
}
Program.cs
Program.cs doesn't really need much explanation. This is the simplest hello world program that all C# developers have seen millions of times. There is a class called Program with a static Main method which writes "Hello World to the console."
using System;

namespace ConsoleApplication
{
    public class Program
    {
        public static void Main(string[] args)
        {
            Console.WriteLine("Hello World!");
        }
    }
}
Executing the Package
To execute the package there are two steps:
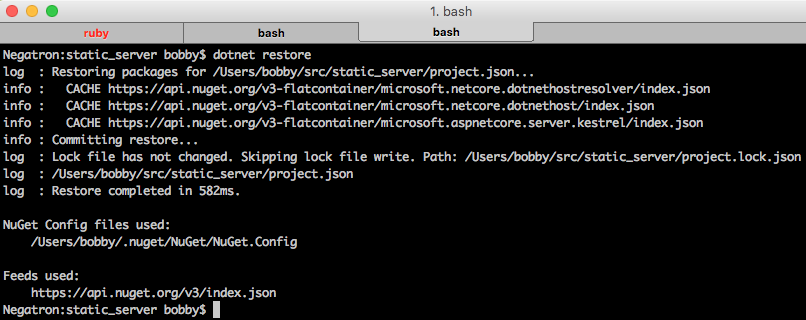
1. Restore Packages
The project has a single dependency that needs to be pulled on to the system in order to compile the package. This can be accomplished using the CLI in bash:
dotnet restore will inspect project.json and resolve all of the dependant packages.
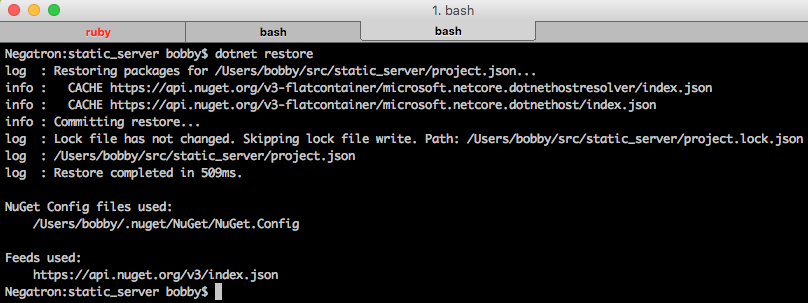
Note: If this is the first time you have run a restore on your machine, your output will be considerably larger than what is displayed in the screenshot above. The core app meta package has dependencies on a large number of other packages that will be downloaded from Nuget.org and cached on your local machine.
2. Compile and Run
To run the project you need to build the package and execute it. This can be accomplished in two seperate steps using the build and run commands or in one using just the run command which will perform the build for you if needed.
dotnet run
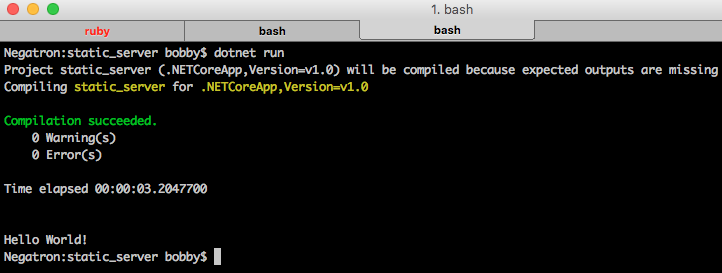
Finally!
Let's pause here and take a moment to celebrate .NET executing on OSX.

Making the Package Respond to HTTP Requests
At this point we have a console application, but what we really want is a web application that responds to HTTP requests. To do this we will take a dependency on the Kestrel web server Nuget package.
1. Update project.json
Simply add the Kestrel dependency to the project.json.
{
  "version": "1.0.0-*",
  "buildOptions": {
    "emitEntryPoint": true
  },
  "dependencies": {
    "Microsoft.NETCore.App": {
      "type": "platform",
      "version": "1.0.0-rc2-3002702"
    },
    "Microsoft.AspNetCore.Server.Kestrel": "1.0.0-rc2-final"
  },
  "frameworks": {
    "netcoreapp1.0": {
      "imports": "dnxcore50"
    }
  }
}
2. Run a Restore
dotnet restore will pull all the needed packages from Nuget.org.
3. Update Program.cs
Now we need to wire up Kestrel in our application and tell it how to respond to HTTP requests.
using Microsoft.AspNetCore.Builder;
using Microsoft.AspNetCore.Hosting;
using Microsoft.AspNetCore.Http;

namespace ConsoleApplication
{
    public class Startup
    {
        public void Configure(IApplicationBuilder app)
        {
            app.Run(async ctx => await ctx.Response.WriteAsync($"Hello World!"));
        }

        public static void Main(string[] args)
        {
            new WebHostBuilder()
                .UseKestrel()
                .UseStartup<Startup>()
                .Build()
                .Run();
        }
    }
}
The entry point to the application has changed to use a builder to wire up Kestrel and tell it to begin listening to requests. At a minimum, you have to tell the builder to use kestrel and tell it what startup class to use.
Note: In this example, I have combined by program's entry point and it's startup class into a single type. This is a convenience for the purposes of this article so I don't have to introduce multiple code files. Typically this might be two seperate code files Program.cs and Startup.cs. Visual Studio will setup it up that way by default.
The Configure method is called automacially in the web host bootstrapping code and is the point where you tell the application how to handle requests. This example responds to all requests with "Hello World!".
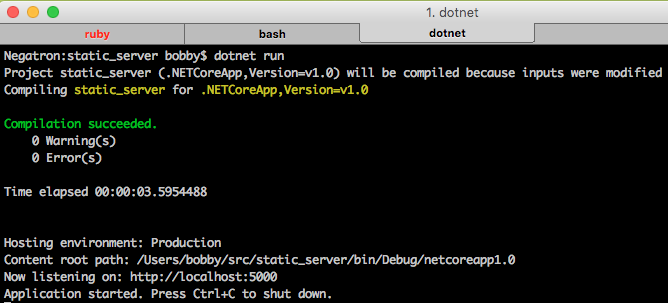
4. Compile and Run
Executing dotnet run from bash is now starts the application listening on port 5000.
Making the Package Serve Up Files
Now that we have an application that responds to http requests, Let's get it to serve up files from the file system. To do this we will take another dependency on the StaticFiles Nuget package.
1. Update project.json and Run a Restore
Add the following dependency declaration to your project.json file.
{
  "version": "1.0.0-*",
  "buildOptions": {
    "emitEntryPoint": true
  },
  "dependencies": {
    "Microsoft.NETCore.App": {
      "type": "platform",
      "version": "1.0.0-rc2-3002702"
    },
    "Microsoft.AspNetCore.Server.Kestrel": "1.0.0-rc2-final",
    "Microsoft.AspNetCore.StaticFiles": "1.0.0-rc2-final"
  },
  "frameworks": {
    "netcoreapp1.0": {
      "imports": "dnxcore50"
    }
  }
}
dotnet restore will pull all the needed packages from Nuget.org.
2. Create a wwwroot directory with an index.html
mkdir wwwroot will create the directory.
touch wwwroot/index.html will create an empty index.html file to serve up.
3. Add Some Boilerplate html
Add the following to index.html.
<!doctype html>
<html>
    <head>
        <meta charset="utf-8">
        <title>Hello World!</title>
    </head>
    <body>
        <p>Hello World!</p>
    </body>
</html>
2. Update Program.cs
Now we need to wire up our application to serve static files.
using System.IO;
using Microsoft.AspNetCore.Builder;
using Microsoft.AspNetCore.Hosting;

namespace ConsoleApplication
{
    public class Startup
    {
        public void Configure(IApplicationBuilder app)
        {
            app.UseStaticFiles();
        }

        public static void Main(string[] args)
        {
            new WebHostBuilder()
                .UseContentRoot(Directory.GetCurrentDirectory())
                .UseKestrel()
                .UseStartup<Startup>()
                .Build()
                .Run();
        }
    }
}
There are two modifications here. First the Configure method now calls the UseStaticFiles extension method on the IApplicationBuilder interface. This tells our application to use the static files middleware to respond to HTTP requests. Second is the addition of the call to UseContentRoot in the WebHostBuilder chain. This tells the application the root directory of our application and where it will find the wwwroot folder we created. With this line missing our application would simply serve up 404s because it doesn't know where the wwwroot is located.
4. Compile and Run
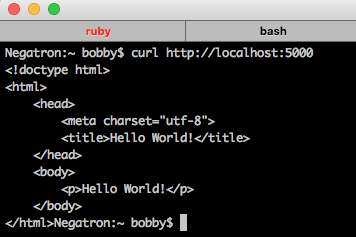
Executing dotnet run from bash now starts the application listening on port 5000. Any file we add to the wwwroot directory will now be served up.
Note: At this point we have to explicitly request the file we want by name. Hitting the root of our site will return a 404.
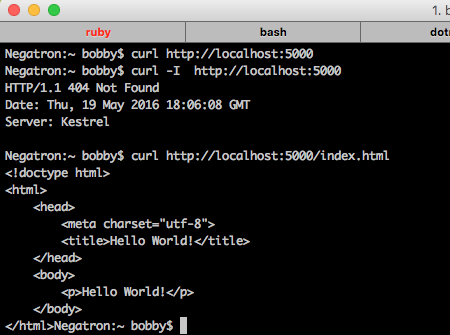
WAT?!
The 404 may at first seem strage, but with ASP.NET Core everything must be explicitly opted in. We can wire up default documents by adding a single line to our Configure method.
using System.IO;
using Microsoft.AspNetCore.Builder;
using Microsoft.AspNetCore.Hosting;

namespace ConsoleApplication
{
    public class Startup
    {
        public void Configure(IApplicationBuilder app)
        {
            app.UseDefaultFiles();
            app.UseStaticFiles();
        }

        public static void Main(string[] args)
        {
            new WebHostBuilder()
                .UseContentRoot(Directory.GetCurrentDirectory())
                .UseKestrel()
                .UseStartup<Startup>()
                .Build()
                .Run();
        }
    }
}
And now we have default docs being served up.
Note: The order of operations is important here, if we were to reverse the calls the static files middleware would respond with a 404 before the default files middleware has a chance to inspect the request and insert a default file into the response. This holds true for all middleware wire up in the configure method.
With RC2 you can use the method UseFileServer to add both default documents and file serving at once. Allowing you to sidestep this possible configuration issue. UseFileServer takes an optional parameter enabledDirectoryBrowsing that is false by default. Enabling this flag will serve up html showing listings of the files available in each directory that does not have a default document.
If you run the application with directory browsing enabled based on this article, you will get an error.
Unhandled Exception: System.InvalidOperationException: Unable to resolve service for type 'System.Text.Encodings.Web.HtmlEncoder' while attempting to activate 'Microsoft.AspNetCore.StaticFiles.DirectoryBrowserMiddleware'.
This error is generated because we have instructed our application to use the DirectoryBrowserMiddleware, but we failed to make all of the dependent services needed by the middleware available.
To do this we need to modify the application and hook into the dependency injection bootstrap method ConfigureSerices. Then add a call to AddDirectoryBrowser to ensure that all required dependencies for directory browsing are registered for injection.
using System.IO;
using Microsoft.AspNetCore.Builder;
using Microsoft.AspNetCore.Hosting;
using Microsoft.Extensions.DependencyInjection;

namespace ConsoleApplication
{
    public class Startup
    {
        public void ConfigureServices(IServiceCollection services)
        {
            services.AddDirectoryBrowser();
        }

        public void Configure(IApplicationBuilder app)
        {
            app.UseFileServer(enableDirectoryBrowsing: true);
        }

        public static void Main(string[] args)
        {
            new WebHostBuilder()
                .UseContentRoot(Directory.GetCurrentDirectory())
                .UseKestrel()
                .UseStartup<Startup>()
                .Build()
                .Run();
        }
    }
}
Summary
In this post, I have shown how to create a simple static file server using ASP.NET Core RC2 from the command line in OSX using a simple text editor. This application will run in Windows, OSX and Linux. The complete source for this article can be found here.