Simplest Possible ASP.NET Core Web Application in Docker for Windows
Create Project
First, let's create a directory for our solution and create a couple folders.
mkdir docker-web
mkdir .\docker-web\src
mkdir .\docker-web\scripts
cd docker-web
This simply creates a directory docker-web for the solution and two sub folders src for source code and scripts for powershell scripts we will be creating so we don't have to keep looking up the docker cli switches.
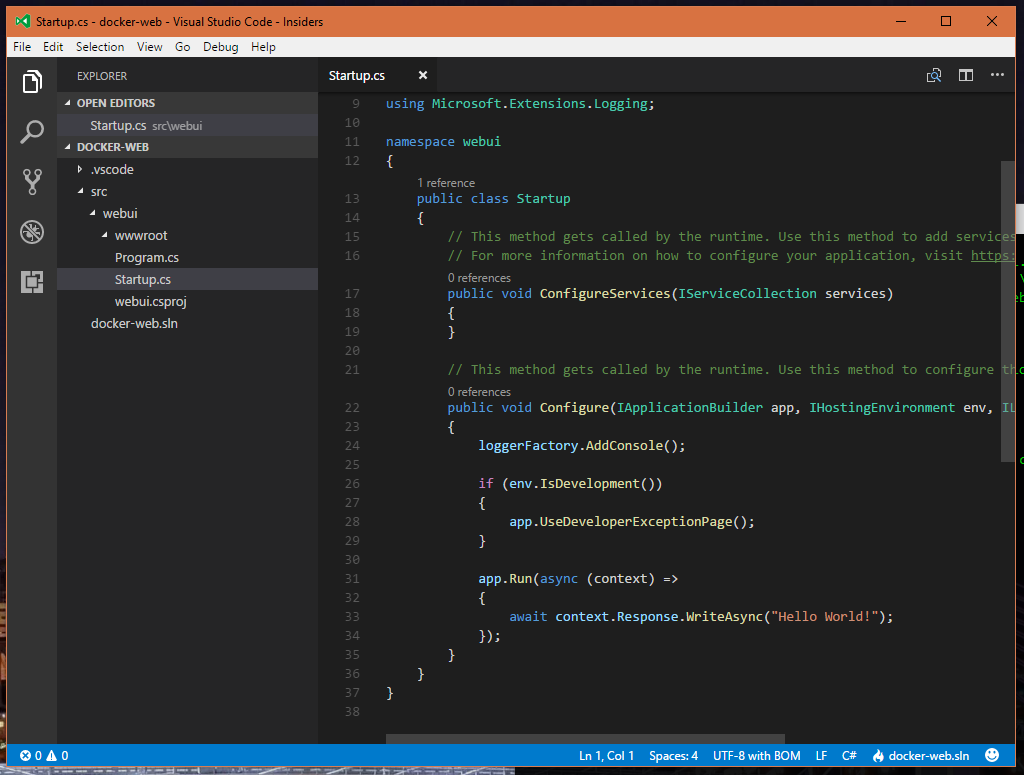
Next, let's create a solution and simple ASP.NET Core web application.
dotnet new sln
dotnet new web -n webui -o .\src\webui
dotnet sln .\docker-web.sln add .\src\webui\webui.csproj
This creates a new solution file named docker-web.sln, which is based off the directory we are working in. Then we create a new ASP.NET Core web application and add it to the solution.
Finally, verify that it runs locally.
dotnet restore
dotnet run --project .\src\webui\webui.csproj
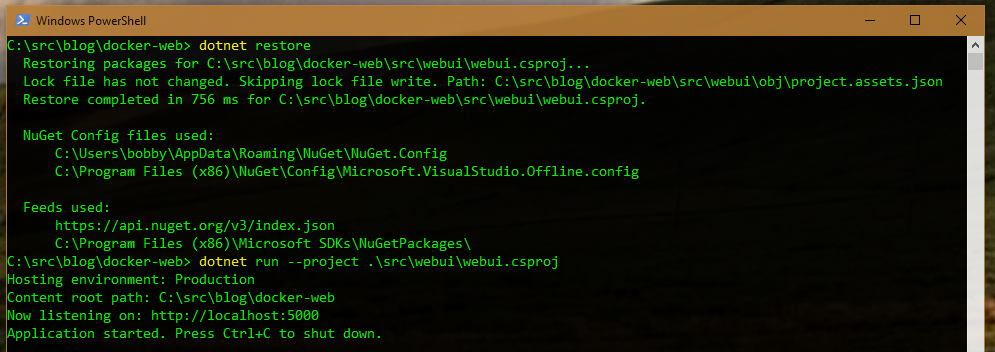
The application should run and if you run curl http://localhost:5000, you should get a Hello World! response.
Note: This starts the application running and listening on port 5000. This is important, we have provided no configuration at all for this application. So, by default Kestrel starts up listening on port 5000.
Build Project to Run on Linux
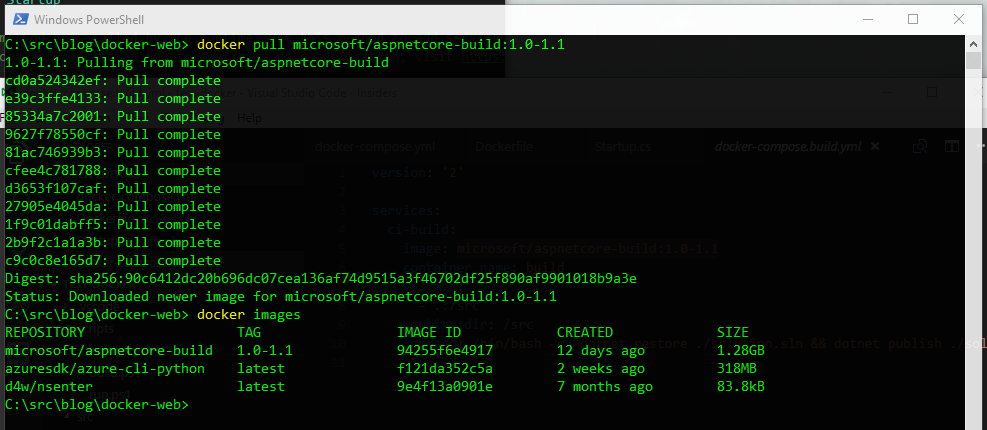
To run the application on Docker for Windows in a Linux based container, we need a way to build it to run under Linux. We can actually use Docker to do this. Microsoft publishes a ASP.NET Core based Docker image specifically for building .NET Core applications for Linux. The image is located here on DockerHub.
We can save ourselves a little time by fetching the image directly. In PowerShell, run the the command docker pull microsoft/aspnetcore-build:1.0-1.1. One it has finished downloading, you can view all the images you have in Docker by running docker images in PowerShell.
Next, create a yml file to define our build services in. Run touch docker-compose.build.yml from PowerShell.
Edit the file and add the following text. Note that the yml file format has significant whitespace. So, make sure your spacing is exactly as listed here.
version: '2'

services:
  ci-build:
    image: microsoft/aspnetcore-build:1.0-1.1
    container_name: build
    volumes:
      - .:/src
    working_dir: /src
    command: /bin/bash -c "dotnet restore ./docker-web.sln && dotnet publish ./docker-web.sln -c Release -o ./build"
Using version 2 of the Docker compose file format, this file creates a single service called ci-build based on the image we just pulled from Docker Hub. It gives the friendly name 'build' to any container based off this file. It then maps the current directory to a directory inside the container /src. This means that our current working directory docker-web and it's contents will be available inside the container in directory /src. The next line sets our working directory inside the container to the /src directory. The final line executes a command using bash that restores dependencies and publishes the output to a directory ./build.
Finally, create a script in the scripts directory called build.ci.ps1. A simple touch scripts\build.ci.ps1 should do the trick.
Edit the file and add the following text.
docker-compose -f .\docker-compose.build.yml -p netcorebuild run ci-build
This script calls docker-compose passing a file reference to our build yml file and calling the run command specifying the ci-build service we defined. The -p netcorebuild portion simply names our container so that we can easily remove it and ensuring that we don't get multiple containers with random names that we have to clean up later.
Run the script by calling scripts\build.ci.ps1.
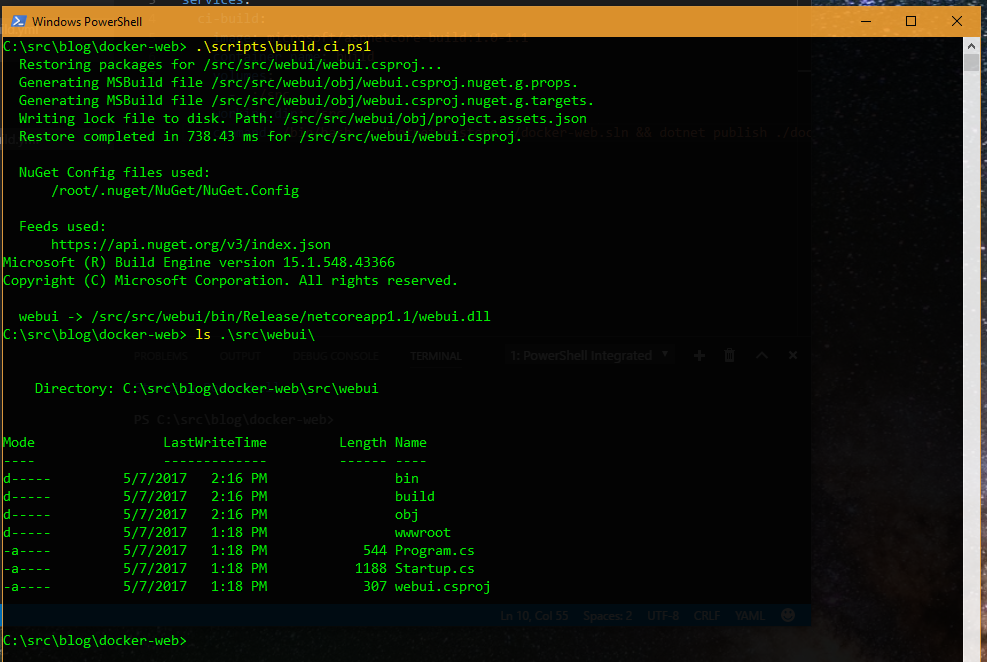
Amazingly enough this looks like we issues these commands directly from our local directory. The output is pretty much the same. But in reality, Docker started a container based off the compose file and executed the commands in the container. Any console output is output to the PowerShell instance.
Also notice that our build output is located in the build folder under our webui project. This allows the solution to grow with possibly more dockerized applications and the build output is isolated.
Create a Container from the Build
Now that we have our built output, we can stand up a container using it. First, we need to create a Dockerfile that describes how to build the container and run the application. The Dockerfile is specific to an application, so it should live next to the source.
Create a Dockerfile using touch .\src\webui\Dockerfile and add the following text.
FROM microsoft/aspnetcore:1.1
ARG source
RUN echo "source: $source"
WORKDIR /app
COPY ${source:-/build} .
EXPOSE 80
ENTRYPOINT ["dotnet", "webui.dll"]
We start by defining the image our container is going to be based on. Here we use the preconfigured aspnetcore image from Microsoft specifying the 1.1 version tag.
Next, it defines an argument named source and then echoes that variable out so we can see its value. We will be passing the value of this argument in via a compose file later.
Then we define a working directory /app and copy our local files to it. The copy command uses the argument we defined above but also provides a default value incase the argument is not passed.
Next we expose port 80 from our container so the application can respond to requests on that port.
Note: The port is 80, not the previously mentioned default port 5000. The aspnetcore image we are using comes with an existing environment variable ASPNETCORE_URLS set to http://+:80. This causes kestrel to bind to port 80 instead of the default.
I cannot stress this enough, I spent the better part of a week fighting a build that would not work the way I wanted it to because I was unaware of the port being defaulted to 80 by the image I was using. Many ragequits were considered, but I ended up writing this blog post instead.
Finally, the Dockerfile defines the entry point for the webui application. This is the same as telling Docker to run dotnet webui.dll from the /app directory.
Now we need to build an image based on the Dockerfile. We can use Docker compose for this as well. Start by running touch docker-compose.yml in PowerShell.
Add the following text to the file.
version: '2'

services:
  webui:
    image: webui
    container_name: webui
    build:
      context: ./src/webui
      dockerfile: Dockerfile
      args:
        source: ./build
    ports:
      - "5000:80"
In this compose file we define a single service webui based on a webui image and forcing the container name to always be webui.
Now at this point we do not have an image named "webui", the next section tells compose how to build one if it does not exist. First the context is set to our local webui source directory, remember this is where the build output is located. We then specify the Dockerfile to use in the build and define the value for the Dockerfile argument source being the build directory.
Note: Dockerfile is the default value for the dockerfile setting, I call it out here because you might have a hand full of Dockerfiles for different purposes. For instance, I might have a Dockerfile and a Dockerfile.windows that define how to build a container for Linux and Windows respectively.
Finally, we specify the port mapping for the webui application. This setting basically exposes port 80 on the container through port 5000 on our host system. I could have set this to "80:80" but I already have something running on port 80 locally.
Note: Be sure to understand that the left hand side of the "5000:80" expression refers to the port on the host machine and the right hand side refers to the port on the container. When you try to access the running container you will hit http://localhost:5000 and Docker will proxy that request to port 80 on the container.
Lastly, we need to use docker-compose to build the container for us. Let's put that in a file scripts\build.ps1 with the following contents.
docker-compose -f .\docker-compose.yml -p webui build
This script calls docker-compose passing a file reference to our yml file and calling the build command specifying the webui service.
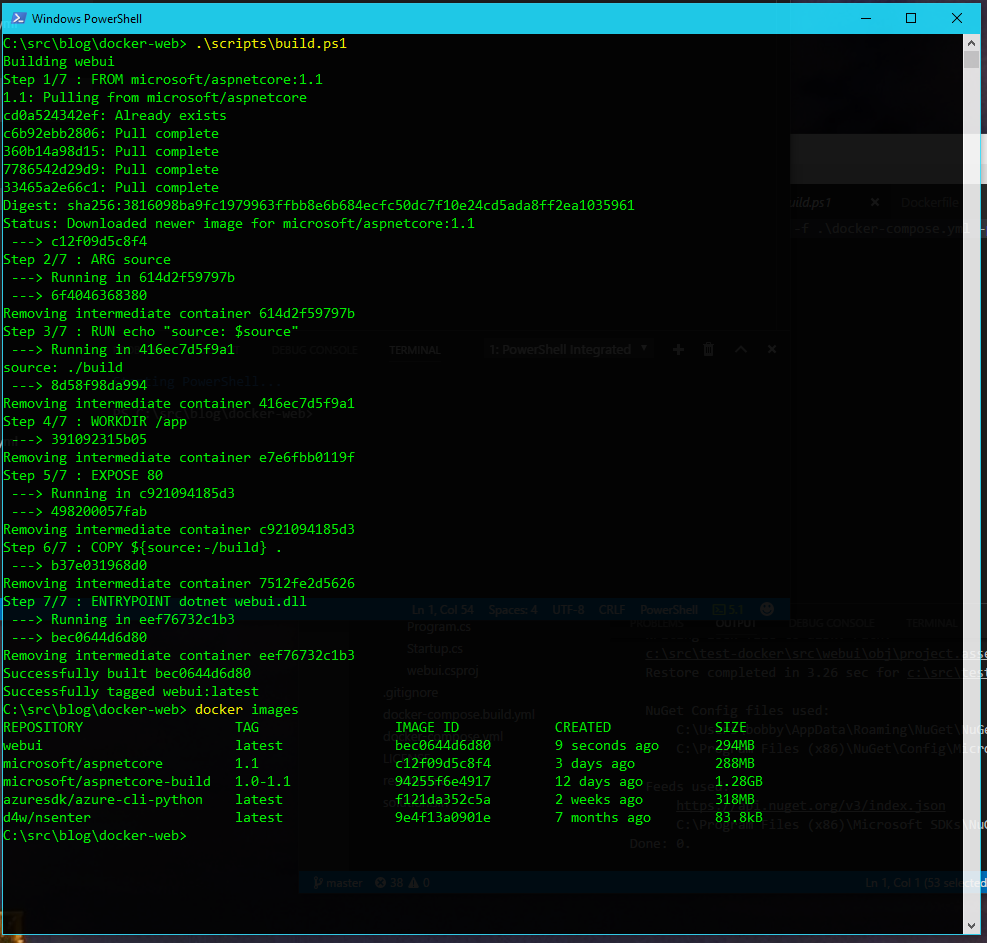
The build command creates a docker container image for us in a seven step process. That process was defined in the Dockerfile. You can verify this by looking at step 3, the step that echoes out the value of our $source argument.
Once the build is complete, running docker images shows the list of images including the webui image tagged as latest.
Run an Instance of the Container
Now that we have a built image, we can easily start a running instance container using Docker compose. We don't need an additional yml file. We can reuse the last one simply using a different command up.
Create scripts\run.ps1 and add the following text.
docker-compose -f .\docker-compose.yml -p webui up -d
The up command will start all the defined services in the docker-compose.yml file. The only thing to note here is that we are giving our project a base name of webui for convenience and using the -d flag to run detached. This allows us to keep using our PowerShell console.
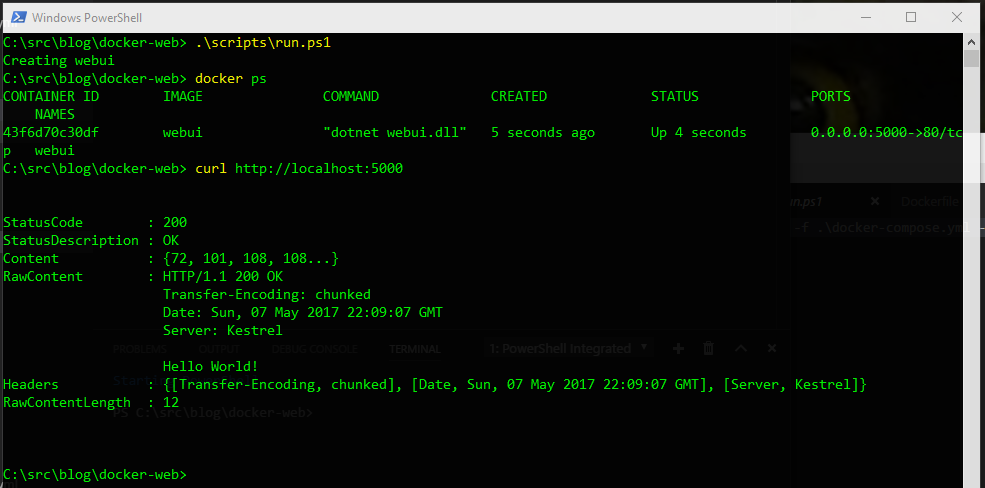
Once we run the script, Docker will stand up a container running the application. You can see all running containers via a docker ps. And we can get a response from the application via a curl http://localhost:5000.
Note: When we ran the application locally outside of Docker, you might remember there was console output letting us know the application started up and what port it was listening too. Anything written to standard out or standard error is captured by Docker. We can get access to that output from a Container using the logs command.
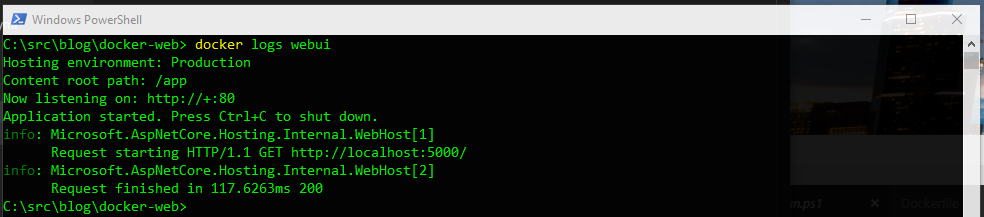
The docker logs webui command displays the logs from the running container named webui.
Cleaning Up
To stop the container, delete it and the image it was based on use these commands.
docker stop webui
docker rm webui
docker rmi bec
Note: The value bec are the first 3 characters of the image id of the image we created. This will be different on your machine. Run docker images to view a list of images and their image ids.
The complete source code for this post can be found here.
"DSC_0026" By Orin Blomberg is licensed under CC BY 2.0